decal application to windshield
#1
OK, so I got my windshield replaced a while ago. The place that did the installation gave me a windshield with that dorky blue tint at the top. I can't stand it. 
So I decided the thing to do would be to get an opaque black vinyl decal to go across the top of the windshield to cover up the dorky blue tint. So I went on over to www.edecals.com and got one of their big-*** decals that can be cut to size and applied to your windows.
Their instructions said to run a strip of masking tape along the long edge and use that for a hinge to fold the decal back. Then, peel off the backing and work the sticker onto the glass from the center to the edges to get rid of any bubbles.
Trouble is, the windshield is curved and you can't get a flat surface against which to hinge. I tried my best, but ended up with mad bubbles. It had to come off again because it looked so horrible.
I've got enough sticker left to give it one more try, but before I do, I wonder if you guys have any advice for getting such a large sticker onto a curved surface without ending up all bubbly.
Ideas?

So I decided the thing to do would be to get an opaque black vinyl decal to go across the top of the windshield to cover up the dorky blue tint. So I went on over to www.edecals.com and got one of their big-*** decals that can be cut to size and applied to your windows.
Their instructions said to run a strip of masking tape along the long edge and use that for a hinge to fold the decal back. Then, peel off the backing and work the sticker onto the glass from the center to the edges to get rid of any bubbles.
Trouble is, the windshield is curved and you can't get a flat surface against which to hinge. I tried my best, but ended up with mad bubbles. It had to come off again because it looked so horrible.

I've got enough sticker left to give it one more try, but before I do, I wonder if you guys have any advice for getting such a large sticker onto a curved surface without ending up all bubbly.
Ideas?
#2
The "hinge method" will work well for letters, but if it's just a big piece of vinyl, you're better off doing it wet.
You need a spray bottle, a nylon squeege (or a plastic card; save those used-up phone cards and gift cards!), dish soap, and a hair dryer, and a clean place to work in the shade.
Here's how:
1. Make sure the glass is ABSOLUTELY CLEAN.
2. Take an empty spray bottle, fill it w/warm water and add one good squirt of dish soap. Shake.
3. Peel the paper backing off the vinyl and spray the sticky side with soapy water. Also spray the windshield where the vinyl is going to go.
4. Lay the vinyl in place, and slide it into position. Make sure it's laying flat, no creases or "tunnels".
5. Starting in the middle and slowly working out towards the edges, push the water out from under the decal with the squeege. Don't try to make big long strokes, push a little at a time.
6. Go over it w/ the squeege again, making sure to get the edges really well. Let it sit for a few minutes.
7. S-L-O-W-L-Y peel off the paper on the front side. If the vinyl shows any signs of lifting, stop, squeege it back down again, and wait a while longer.
8. Check for bubbles. If there are a lot of little bubbles, run a hair dryer over the vinyl and squeege them out. For big bubbles, pop them with a pin and push the air out. Wait a day or two and check again. A lot of times tiny bubbles will disappear on their own.
#3
got it on
Well, I got it on, but I am not certain I am satisfied with the results.
I used the 'dry' method. I masked off the portion of the windshield that I did not want to be stickered. I also masked off the bodywork around the windshield. Then I took a strip of vinyl that was wider than my strip of windshield and rolled it up. I peeled back the paper backing and squeegeed it on little by little. (The parts toward the center were hard to reach!)
After it was on, I used an x-acto knife around the perimeter and peeled away the extra stuff.
It worked out pretty good, except for three things.
1. I got a few bubbles. Hopefully, these will evaporate or something.
2. I didn't quite manage to cover up the dorky blue tint all the way, but it is pretty hard to notice, because there's not much showing, and the windshield is kind of dark. I didn't want to go any lower, though, because it's already obscuring my vision a little bit.
3. And this is the worst part: the cut along the bottom edge isn't perfectly even. There are a few irregularities.
I'm going to live with it for a while and see how it goes.
Photos coming soon.
#4
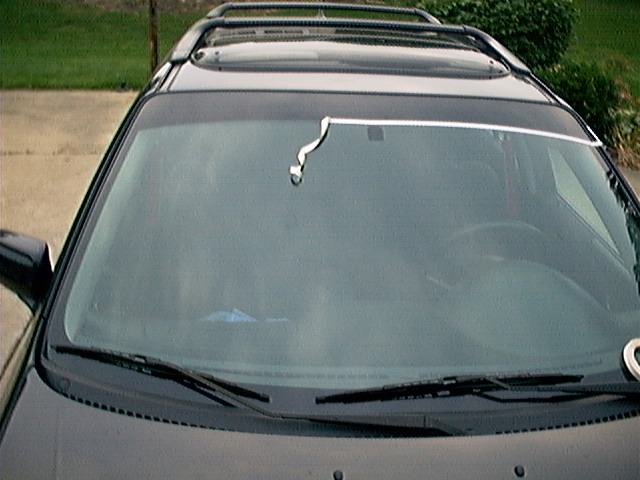
Decal from the outside:

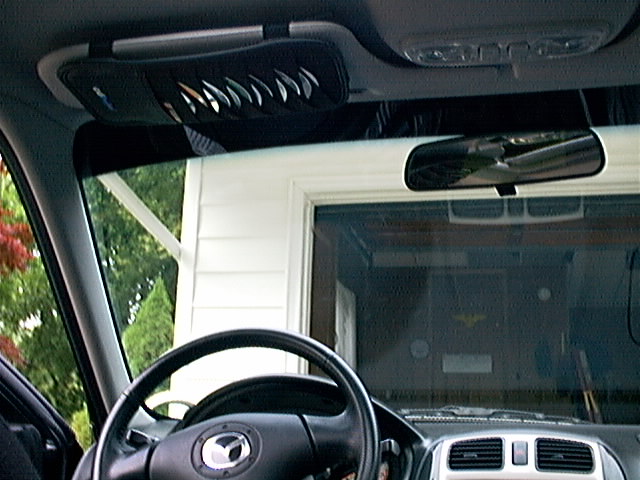
Decal from the inside:

Generally, I guess it came out OK. I'm not 100% satisfied. It looks like something I did myself. But the sticker is black and it doesn't show up too good against the dark background of the windshield, so it is not too noticible.
On the upside, it blocks out the sun where my visor fails to do so.
"Since the beginning of time, man has yearned to destroy the sun." -- Monty Burns

Decal from the inside:

Generally, I guess it came out OK. I'm not 100% satisfied. It looks like something I did myself. But the sticker is black and it doesn't show up too good against the dark background of the windshield, so it is not too noticible.
On the upside, it blocks out the sun where my visor fails to do so.
"Since the beginning of time, man has yearned to destroy the sun." -- Monty Burns
#6
to get rid of bubbles, take a pin or a sharp tip of an exacto knife, you can either poke a hole into the bubble or cut a slit, I recommend poking a hole. Once you've done that, smooth it over with your finger and it should get rid of all your bubbling problems 

#7
That turned out nice! Much better than "dorky blue."
If you do have to pop bubbles, poke 'em, don't slit 'em. Vinyl shrinks over time, and the slits will open up, and let light thru. Your windshield will look like a planetarium from the inside. But I'll bet after a week or so, most of your bubbles will go away.
If you do have to pop bubbles, poke 'em, don't slit 'em. Vinyl shrinks over time, and the slits will open up, and let light thru. Your windshield will look like a planetarium from the inside. But I'll bet after a week or so, most of your bubbles will go away.
#9
Originally posted by Mark_02DX
Your windshield will look like a planetarium from the inside.
Your windshield will look like a planetarium from the inside.
Dewey - is the vinyl totally black, or just dark tinted? I'd like to do something similar, and will go for the black if I must, but a really dark tinted strip would be better for me.
I'm not sure they make tint suitable for outside the windshield - and since I want it to come down past the mirror, I can't really have it done on the inside cheaply.
Looks good though - but keep on being a perfectionist - it's good for you.
~HH
#10
Originally posted by hihoslva
Dewey - is the vinyl totally black, or just dark tinted?
Looks good though - but keep on being a perfectionist - it's good for you.
~HH
Dewey - is the vinyl totally black, or just dark tinted?
Looks good though - but keep on being a perfectionist - it's good for you.
~HH
Thanks to all who said it looks good.

Thread
Thread Starter
Forum
Replies
Last Post
Currently Active Users Viewing This Thread: 1 (0 members and 1 guests)


